fbpx

When to Restore (and when not to)

When to Restore a 1911

By Bill Adair

Deciding when (or why) to restore a firearm is not as complicated a matter as would be indicated by the millions of words written on the subject. “RESTORING AN ANTIQUE WILL DESTROY ITS VALUE” is the phrase most often heard; but, what if its value has already been destroyed by a previous refinishing done badly by one of the great many hacks out there (especially true in the 50’s and 60’s), or what if it’s a pitted, rusty, brown or grey gun with numerous other problems?

Basically, if a gun is not a “collector-grade” specimen, meaning that it has less original finish than what the collector is looking for (say less than 80% as a general guide), then its collector value cannot be considered in the decision to restore or not. The exceptions are: (a) a gun with some documented historical provenance or (b) a gun of great rarity, both of which are factors that outweigh amount of finish or condition as collector-criteria.

So, if a gun is in the less-than-80%/no-provenance category, it has a value to the “accumulator” (most of us), but no real “collector” value.

Probably 95% of the guns coming into my shop are non-collector guns with little or no original finish, are often abused, pitted, gouged, dinged, prevously-overbuffed, hot-blued, cold-blued semi-wrecks in the less-than-10% category. Restoring these “bad-guns” and making them into “good guns” is what it’s all about. It’s either that, or let the effects of abuse and negligence eat them away until they’re gone forever.

I frequently advise my customers not to “mess” with a particular gun if it happens to fall within the collector-grade range. On the other hand, if a collector-grade gun has something wrong with it, which is correctable, but which hurts the value if left uncorrected, I’ll often do a partial restoration to fix that one problem.

As an example, I recently had a would-be collector-grade Colt single-action where the front sight had been filed down to nothing, and the barrel had been hit a few times in the filing process. I made a new front sight of proper shape and height, polished out the file marks and re-blued the barrel using the original nitre-blue, then “aged” it back just a little to match the rest of the gun. Could you tell? No. Did it hurt the value of the gun? No. Did it increase the value? Yes.

Flayderman has written: “Refinishing is akin to taking an 80-year-old man and dressing him in the clothes of a teenager”. I couldn’t disagree more if we’re talking about non-collector-grade guns. It’s more like taking a naked 80-year-old man and dressing him in a nice suit (even though it may not be a new-looking suit). Which would you rather look at?

What needs to be remembered is that there is a world of difference between “refinishing” and “restoration”. The term “refinishing” could mean hot-bluing a single-action (where hot-blue wasn’t invented till about 1937). But “restoration” means doing things right. It means doing it precisely like it was done 80 or 150 years ago by the factory. It means polishing in the exact way the factory did it, and finishing the exact way the factory did it.

There are only a handful of restoration-gunsmiths in the world who can do that… or who will do that. To that handful you can entrust your antique arms.

Editor’s Note: Sadly, Bill Adair is no longer with us. His skill, knowledge and friendship will be missed.

Recommended Modifications to the Colt .45 Auto for Self-Defense Use

by Les Bengtson

The Colt .45 automatic pistol, and its copies, are one of the best self defense sidearms currently in production. It does, however, have several deficient areas brought about due to manufacturing short cuts and/or lack of adequate knowledge on the part of its producers. I will endeavor to explain what modifications I feel are necessary to produce to best defensive sidearm and why they are necessary.

The Basic Gun

The best .45 autos are those of commercial Colt production. The Mk IV/Series 70 Government Model and the Combat Commander (pre Series 80) are especially fine weapons. The Series 80 guns, due to the firing pin safety block, are not as desirable for military use. They are more complex and difficult to maintain under field conditions. They do well as urban environment pistols. The fine Officer’s ACP is only available in this configuration.

Military surplus M1911 and 1911A1 pistols are excellent for back-up or spare guns. Quality is generally good although the finish may be somewhat rough. Some have seen extensive use while others have spent most of their time stored in arms rooms. The quality of the steel may not be as good as that of the Series 70/80 Colt. The slide is only “spot hardened”. This does not make them as suitable for extended use by private owners as the commercial Colts. When the military envisioned the weapons being used for an extensive number of rounds (match guns) they refitted the weapons with a “hard slide” of either Colt or other manufacture. These slides are marked NM followed by a contract specification number and are referred to as National Match slides. Some are available through surplus sales. The National Match slide is no better than a commercial Colt slide. For extended use, the military gun should have the slide replaced with either a commercial Colt or a NM slide. This normally raises the price to the point that it is equal to or above the price of a good used 70 Series.

Springfield Armory (Commercial production) guns are currently made to GI specifications in South America. They may be expected to perform as well as US made military .45s. Overall, the quality of the ones I have worked on has been adequate.

Other .45s. Various companies have produced direct or near copies of the M1911 and 1911A1 over the years. They vary in quality both among manufacturers and among production runs by the same manufacturer. Often, the guns require more work to bring them up to the same standards that a Colt can be brought to. Sometimes, even with extra effort, they fall somewhat short of what a good Colt can achieve. Work performed on non-Colts may be more expensive because of this. In the long run, you will have a gun that has cost as much as a Colt and may have lower resale value.

Recommended Modifications

Sights

You should have a good set of high visibility sights on a defensive arm. Adjustable sights are convenient for hunting, competition, or shooting a number of different types of ammunition. I have not found any yet that did not occasionally break, usually at the worst time possible. The Bomar seems to be the best of the lot. I do not recommend them if you only have one self defense pistol. If you have two pistols, adjustable sights on one of them allows it to be used for hunting and formal target shooting.

Fixed sights are much more rugged and stand up indefinitely on the defensive sidearm. The MMC fixed rear sight is a particular favorite of mine. The Novak sight is currently popular. It does not provide any better sight picture than the MMC, costs more and is more expensive to install.

All front sights should be silver soldered in place with high temp silver solder. I have never seen a silver soldered front sight, properly installed, that came loose. I have seen numerous front sights that were only staked in place shoot loose. The only advantage to staking the front sight is that it does not ruin the blue job on the slide. Since other gun modifications will probably require a complete refinishing anyway, have the sight soldered on and you will not have to worry about what to do when/if it breaks loose.
Trigger

There are two components to the trigger problem- length of trigger and weight and crispness of pull.

Trigger length is a function of the size of your hand and the length of your fingers. The pad of the trigger finger should be square on the front of the trigger or you will pull to one side. Try both the long and the short triggers. Choose the one that fits you best. Military triggers (M1911A1) have a rounded cross section at the front which seems to make the trigger pull seem heavier. They should be replaced with a commercial trigger.

Weight of pull should be crisp and about 4 pounds. If your pistol has a crisp pull of 4-4 1/2 pounds you do not need a trigger job. If it does not, you do. Trigger pulls below 4 pounds should be avoided on a defensive gun, but may be desirable on a pistol used primarily for competition. After a trigger job, the slide should never be dropped using the slide stop. This jars the weapon and sometimes drops the hammer to half cock. When the slide is locked back and a new magazine inserted, cycle the slide as if it were in battery and this problem will not occur. Holding the trigger to the rear when dropping the slide from the locked open position has been recommended by some. It does work and may be required if you have not developed a strong grip on the pistol. I have found some students who have a problem with the hammer dropping to half cock on guns that do not do that for me. They did not grip the pistol as strongly as I do and the inertia of the slide going forward caused the trigger to jar the sear slighly, hence the hammer fell to half cock. Try it both ways. My way helps to develop a habit pattern that is used in certain malfunction drills taught in the modern technique of the pistol.

Beavertail or Ducktail Grip Safety

This modification spreads the recoil over a greater area and seems to lead to a better initial grip upon the weapon. Even a properly dehorned standard safety tends to damage the shooting hand when used for extensive practice sessions. Ross Siefried, former World Champion remarked, when he switched to a beavertail, that his hands never became hardened enough to avoid damage with the standard grip safety. The Clark, Wilson and King’s models allow the standard Government spur hammer to be bobbed and used with them. The Brown “high ride” safety requires that a Commander style cone hammer be used. The Brown is an excellent choice for the Officer’s ACP and similar pistols with shorter frames as it allows a higher grip on the pistol. Any of the listed beavertails will work well with the full sized frames.

Speed Safety

The extended safety provides a shelf to rest the thumb on when shooting. The standard safety is sometimes missed in practice. Mel Tappen wrote that a speed safety was cheap insurance against missing the safety when it was really needed. I concur. Additionally, the thumb safety is sometimes bumped into the on-safe position. This has happened at least once in a real life encounter. A speed safety, with the thumb kept on top of the safety when firing, will prevent this problem.

Ambi safeties are available for left handed shooters. They serve little use on a duty pistol for a right handed shooter. The concept that it allows you to use the pistol with the weak hand if you have been shot in the right arm has developed out of IPSC shooting. If you have been shot with the pistol in your hand, the safety is already off. If you are shot with a holstered pistol, you seek cover or attempt to withdraw. The right side safety can be released fairly easily with the index finger of the left hand by anyone who has practiced a few times. We recommend only the strong side safety except for strictly competition pistols.

Throating

Most barrels, except the 70 and 80 Series Government models require throating and matching of the feed ramp to the barrel for any ammunition except hardball. Most of the 70 and 80 Series guns are roughly throated and may hang up with certain types of ammunition. Throating of the barrel and polishing of the feed ramp in the frame are cheap insurance against failure to feed. Lower and teardrop ejection port

Government models normally have a smaller ejection port than Gold Cups and Commanders. Enlarging the ejection port makes them slightly more reliable. Even on pistols that have the lowered ejection port, we open up the port slightly more for increased reliability. This is a small, but important, point.

Teardropping the ejector port is easier on the brass since the slide hits the case before it clears the ejection port and this modification breaks the sharp angle there. While I had previously believed that this is mainly a modification for reloaders, there seems to be some small, but definite, reliability increase with this modification. The slide strikes the cartridge lower on the brass and lessens the possibility of a “smoke stack” malfunction.

Stipple or Checker the Forestrap

Stippling or checkering the forestrap gives a firmer grip than the normal bare frame. Since the main force of the strong hand on the weapon is on the fore and back straps, this translates to a more secure grip on the weapon. This is particularly true on a weapon with a nickel finish.

Checkering looks very pretty and provides a very secure hold. Either 20 or 30 lines per inch may be used. It is acceptable for use in a duty holster. When used in a holster that is inside the pants or close to the body, it tends to abrade the clothing and catch on things. When used concealed, it tends to tear up the jacket lining. It acts as a very sharp file. It can make the concealed draw much more difficult due to this. It is also much more expensive than stippling.

Stippling provides a less abrasive surface than checkering. It is superior in every way to checkering on a normal duty gun.

Finishes

After having your defensive pistol modified, you should shoot the weapon until you are sure that it is set up exactly as you want it and that it functions with complete reliability. Normally, a reblue at the time of the modification is in order. While the bluing only provides marginal protection against rusting, it is often adequate for most shooters. It is also easily removed if you decide you want to make some change in the weapon set up. When you are sure that you have your pistol set up exactly as you want it and you have analyzed your carry pattern (in a belt holster, an inside the pants holster or a gun case, etc.) you are at the point to decide whether you wish to replace the bluing with a more durable (and more expensive) finish. For most people, however, a matte finish blue will be more than sufficient for the majority of their shooting and carrying needs. If you should decide you wish a more durable finish, there are several to choose from. Parkerizing, electroless nickel, hard chrome and TAF-1 (a molibdinum disulfide finish) are available. All are applied finishes that go on the surface of the metal rather than changing the surface as bluing does. They all have better rust resistance than bluing. The TAF-1 finish can also be applied to stainless steel providing both increased rust resistance and do away with the problem of a shiny pistol reflecting light. All applied finishes will wear over time and can allow rusting to take place. Removal of some applied finishes (hard chrome, electro and electroless nickel) require special stripping procedures. TAF-1 and parkerizing can be removed by normal refinishing methods.

Other Modifications

To be based upon personal preference and perceived need.

Funnel magazine well

This makes it somewhat easier to insert a magazine during a speed load or when loading with eyes on the target. Many people, by practicing more, do fine without it. Magazine funnels that bolt on to the bottom of the frame or the S-A Mag funnel/main spring housing should all be custom fitted to the frame. They are not perfect drop ins.

Match barrel bushing

This can provide a slight increase in accuracy. It is generally a part of work done on the more advanced guns. It is not strictly necessary on a self defense pistol. Any pistol having the 70 Series collet bushing should have it replace with either a match or other solid bushing to prevent breakage of the collet fingers.

Recoil Spring Guide

This system is unnecessary on the Government and Commander models and interferes with the proper “pinch check” of the weapon. The Officer’s ACP and some Springfield models have a recoil spring plug that is held in the slide by a small teat rather than the barrel bushing. These break, normally at the worst possible time, rendering the pistol inoperative. They should be replaced. In the case of these pistols, with their more marginal functioning, a full length guide rod and replacement plug is a must. Wilson makes the best system for both the Colt and Springfield pistols.

General

A general smoothing up of the moving parts in the action and “dehorning” (smoothing of all sharp edges) should be a part of any combat tune-up. Other items such as extractor tuning are done on an as required basis. A slightly heavier than normal recoil spring (18 1/2 # for the GM and 20# for the Commander) provide a little extra power when chambering a round. I use them on mine, but did not for many years with no great difference in reliability. Like the speed safety, it is a small bit of extra insurance.

The foregoing is a general guide to the combat modification of the Colt .45 auto. The suggestions are based upon extensive use of this weapon in the military, combat competition and practical instruction. I hope these thoughts will be of use to you in setting up your own self defense piece. Please feel free to contact me if you have any questions.

THIS MONOGRAPH MAY BE REPRODUCED ONLY FOR NON-COMMERICAL USE WITHOUT OTHER PERMISSION OF THE AUTHOR. REPRODUCTION FOR COMMERCIAL USE ONLY BY WRITTEN PERMISSION.

Copyright 1986, 92, 93, 96, 97, 98 by Les Bengtson


L. Bengtson Arms Company
Mesa, Arizona
(480) 981-6375

[email protected]

AAS, Gunsmithing
Certified Police Armorer
Certified Gunsmithing Instructor
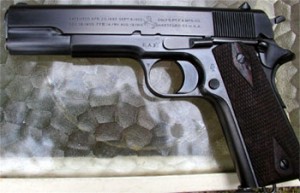
Slide Locks Back on Kimber with Ammunition Still in the Magazine

From: Steven P. Schaufler

Well, I put about two hundred rounds through my new Kimber Compact CDP pistol this afternoon. I found it to be quite accurate, shot to point of aim, and was very comfortable shooting. This Commander sized pistol, my first, just “feels right” and seems much better balanced than my Defender. I did run into one problem though. In firing the approx. two hundred rounds I experienced three stoppages, all related to the fact that the slide stop engaged while the magazine still had rounds in it. I know some advised me that they had, with their Kimber Combat Carrys, trouble in that the slide stop failed to engage at all, I’m not having that problem at all, but just the opposite. If anyone can tell me the cause or possible cause for this and a solution, I’d be much obliged. Thanks.

From: Syd

Steven, I was having this problem occasionally with my Compact. I replaced the slide stop with a Wilson “Bullet Proof” slide stop and it hasn’t happened since.

From: Paul Schwenke

The cause of the problem is usually do to the nose of the bullet (large diameter nosed like the 230 Ball or hollowpoints) bumping against the slide release and engaging it. The other possible solution is do to your left hand bumping the slide release. I have had both happen on different guns.

The first reason is why my hybrid pin gun is filed and smoothed so the slide release doesn’t work at all. Using large 255gr SWC made for 45 long colts hit the slide release very often. More losses occur do to this problem than any other I know of. Some guys think it is their shooting style rather than bullet shape. You file the area where it engages the magazine lip for proper function. Try shooting 200 grain SWC in the gun to see if the malfunctions go away.

Carefully take off or smooth the area of the slide release which touches the magazine lip until the problem goes away or bring it to a gunsmith. If you have dummy rounds put them in a magazine. Take the gun and make the slide be held back by the slide release, carefully put in the mag of dummy rounds, and watch what area of the bullet hits the slide release. Do minor adjustments to the slide release then after. Some of the 230 Ball ammo or equivalents has different shaped ogives on the bullet. This causes problems on many guns. Another He shouldn’t charge very much.

From: Paul Schwenke

Kudos to Paul for his timely AND correct advice. Following it, I discovered that if the rounds were correctly positioned in the magazine with the back of the cartridge firmly against the back of the magazine there was no contact between the bullet and the slide stop. However, if the bullet had moved forward, even as little as an 1/8 of an inch while in the magazine (which, as we all know, commonly happens under recoil, particularly to the last few rounds in the magazine when the spring strength is at it’s weakest) then the bullet DID make contact with the slide stop and lifted it up as it (the bullet) rose into position to be chambered (this would also explain why it didn’t occur every time and only after the first few rounds had been fired). I found, at least on this slide stop, that there was a big leeway between the amount of metal that was contacting the bullets as compared to the amount needed to reliably contact the magazine follower. Seeing this, I filed off the metal at the contact point till it no longer touched, even in a worse case scenario, with the bullet well forward of the back of the magazine. I’ve yet to actually test this fix, but am confident that the problem has been cured. Time at the range tomorrow will tell the tale. Thanks again, Paul, for the help.

I must add that I feel good about being able to fix the problem, but I don’t feel quite so good knowing that my Kimber is the most expensive 1911 I’ve ever purchased and also the only one I’ve ever had to work on to get to reliably shoot hardball. All my other 1911s were Colts and they shot reliably right out of the box. My Defender DID have a last round jamming problem, but it was magazine related. No knock on Kimber, because this is also the most accurate 1911 type I’ve owned and the workmanship on it is obvious, but just a simple statement of fact.

From: Wayne Smith

Hope you got it fixed, Steven. Now, be aware that some followers move left to right, also. If you filed off enough of the tab, you may find that some mags won’t lock up on empty, some of the time.

From: Syd

I think Paul’s diagnosis is correct, that of the bullet bumping the slide stop, and if you’re comfortable with trimming it yourself, I am pretty sure that the fix will work. My Compact is my match gun and I noticed that the MIM slide stop had gotten beaten up, so it seemed that the replacement was the way to go in my situation. Also, mine didn’t lock back prematurely when it was new. It was only after about 4,000 rounds that I began to have the trouble.

From: Don Blaufuss

Steve: Before you start grinding and replacing, I had the same problem with a new full size Para-Ordnance limited, called the factory and they said its an inertia problem. They fix it by putting a small dimple on the slide stop where the plunger contacts the slide stop. They wanted me to send it to the factory but I didn’t want to have it gone for 2 months so i used a small drill bit and put the dimple in myself. You don’t need a big crater or a hole, just enough for the plunger to have something to work with. Worked for me.

From: “Mike Fairleigh”

I did experience the “slide locked open with rounds in the magazine” syndrome twice, however – once with the factory POS Shooting Star mag, and once with one of my Wilson Combat mags. Both were with Win 230 gr. ball. It seemed clear that the next round in the mag was just brushing the slide stop up. I know this was discussed here not long ago; what was the final consensus as to the fix? Stone the stop? I’m concerned about removing too much. Replace it? Thanks for any input.

From: Steven P. Schaufler

Hi Mike. I’ve performed this operation twice within the last few weeks, most recently a few days ago. First let me say, and I’m sure you’re already aware of this, it has nothing to do with the brand of magazine, but rather the fact that you were shooting hardball. The hardball bullets are ever so slightly longer than most hollowpoints and when the cartridges get pushed up a tad in the magazine from the recoiling of the pistol they contact the slide stop as they are pushed up and, of course, the slide stop locks back and you have a stoppage. The fix is pretty easy and is a relatively safe procedure. Before I go on, I’d suggest you call Kimber, tell them about your slide stop problem and have them send you a replacement which they will cheerfully do. Chances are it will be exactly like the one you have, but it can act as a backup in case you DO remove too much metal, as unlikely as that possibility may be.

Now to the fix. What I did was I first removed the slide from the frame and inserted the slide stop into position as if the pistol were assembled. Then I took one of my magazines, loaded a hardball cartridge into it, then pushed the cartridge forward as far as possible while still being able to keep it under the lips of the magazine and still at the normal angle. Then I inserted the magazine into the mag well and slowly pushed the magazine upward. When the cartridge got to the point where it was at the level of the slide stop, I noted exactly where the bullet head was engaging the stop (you can also do this with an empty mag and you’ll see that there is much more metal engaging the magazine follower than there is causing interference with the bullets, so there is very little chance of you removing too much metal). Now just remove the slide stop from the frame and remembering the area where it was touching the bullet head, start filing. In the case of my two, it was along that rear edge, the edge closest to the magazine well, and that point or angle where that edge and the forward edge meet. Good luck and tell us how you make out. I’m sure you’ll have no problems with it.

Parkerization

By Syd

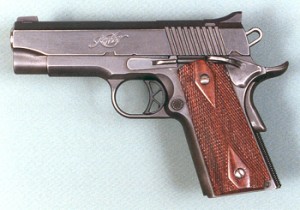
My favorite pistol, a Kimber Compact prior to parkerization

After 3 ½ years of heavy use, my beloved Kimber was looking pretty ragged. The original black phosphate finish was all but gone on the slide and I had been retouching it with cold blue. That works ok for small spots, but it doesn’t do as well on larger areas. Then after a marathon weekend of matches, I was cleaning it and noticed that the plunger tube was getting loose. Ok, time to surrender to the inevitable and take it to someone who knows what he is doing. I am fortunate that a local guy, Danny Jackson, really knows how to do the traditional gun finishes, particularly the mil-spec parkerization.

Even though I knew Danny and knew the quality of his work beforehand, it was still a bad moment when I had to turn it over to him for the face-lift, kind of like putting your baby boy on the school bus for the first time. One of my concerns was that the acid bath would take away metal and cause the gun to get loose. Danny said that the process would take a bit of metal away, but it also put it back on and bonded it to the surface. I accepted that at face value but the more I thought about the business of the bath putting the metal back on, the more I wondered about it. I realized that, while I knew what parkerization looked like, I really didn’t know how it worked. I queried a couple of the guys on 1911 TechTalk and here are the explanations that came back:

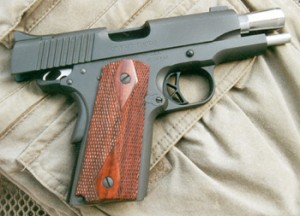
The Kimber with its new parkerization job

A: “Phosphoric acid is used. It replaces the iron eaten away with a phosphated coating which is fairly tough and which, being already oxidized and molecularly bonded to the underlying steel, will not crack, flake or chip.” (Frank Warren)

“The iron atoms bond with the phosphorous and some others (manganese) to make the coating. The acid bath is fairly mild & doesn’t strip off any significant dimension of metal. As it does roughen the surface, it shouldn’t be allowed to get into the bore or chamber.” (Norm Glitz)

“As I understand it, the process of “converting” creates larger surface molecules by the combining of phosphorous [etc.] atoms to the top “layer” of iron atoms, and as a result, the surface dimensions change/grow by up to a 1/2 thousandths or so. A common saying was that the conversion chemicals go into the base material as much as it adds on the outside, so, as you’re converting the molecules of the surface, a sort of “swelling” of the outer layer of molecules takes place in the process. Purely a lay description, but understandable.” (Keith Whaley)

Anyway, the gun looks great, perhaps better than it did new. I be a happy camper.

Instructions for a home parkerization job can be found at: Culver’s Shooting Page

Note: The Culver recipe was not used on my Kimber

Kimber Series II Firing Pin Block Safety

Kimber Series II Firing Pin Block Safety
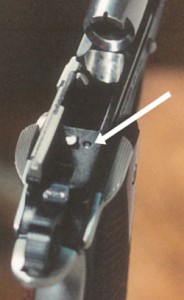
White arrow points to pin which engages firing pin block plunger in slide

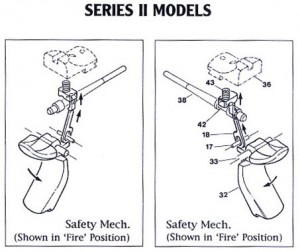
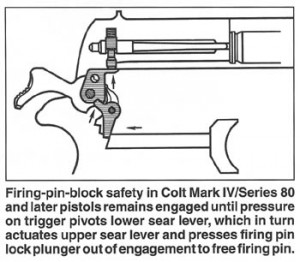
Kimber has begun to install what they call the “Series II” firing pin block. (It is essentially a resurrection of the Swartz safety developed for Colt before the Second World War). When you depress the grip safety, a small pin pushes a plunger up in the slide which unblocks the firing pin. I do like it better in one respect than the Series 80 firing pin block of Colt: it is activated by the grip safety, not by the trigger (see diagram), so you get the clean trigger pull sans the click and crunch of the Series 80 guns. You have to be careful when you field strip and reassemble a Series II Kimber because if you hold it by the grip and activate the grip safety, a little pin comes up next to the disconnector and it will stop the slide from coming off or going on, and if you get muscle-bound with it, you could shear the pin and render the gun unable to fire. Also, the FPB mechanism can only be accessed by removing the rear sight should you need to do cleaning or maintenance on it. I’m not terribly wild about this characteristic. (I still believe this is a lawyer-friendly answer in search of a question. I continue to search for documented instances of 1911 pistols going off from being dropped on their muzzles, and I have yet to find one documented instance of an unmodified 1911 in good repair discharging due to a drop on the muzzle from any kind of normal height – if you find one, please send it to me).

Kimber Series II firing pin block diagram

Colt Series 80 Firing Pin Block Mechanism

Series 80 Firing Pin Block

This firing pin blocking mechanism on the Series 80 Colts differentiates the Series 80 Colts from the “true” M1911A1 pistols. The M1911 and M1911A1 pistols do not have this device. The purpose of the firing pin block is to prevent the firing pin from moving forward unless the trigger is depressed. This “lawyer friendly” mechanism is supposed to prevent “accidental discharges” caused by dropping the pistol or catastrophic mechanical failures. Many 1911 purists feel that the firing pin block adds some mush to the trigger pull although it isn’t very much. Remember that no mechanical gadget can replace the safety device which resides between your ears.

My Own Fluff and Buff

By Syd

Fluff and Buff
Fluff and Buff

First, let me say a couple of things about what this article is not. It’s not about trigger jobs and it’s not about repairing problems in troubled guns. For full reliability tuning of the M1911 pistol, see John Marshall’s superb “Reliability Secrets”. Second, there is very little in this article which cannot be accomplished by running a few thousand rounds through the pistol. What we’re talking about here is smoothing moving surfaces, reducing friction and insuring trouble-free operation of a new handgun. While I’ll talk about M1911 pistols, this process isn’t limited to that gun alone. The inspiration for the article actually came from the break-in of a Kel-Tec P32.

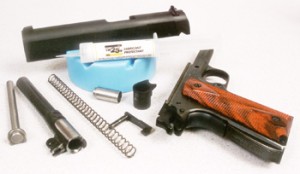
The first thing you want to do with your brand new box-stock pistol when you get it home is to open the box and RTFM (“Read The Flippin’ Manual” … well, that’s not really what it stands for, but you get the idea). Understand how to do a basic field strip on the pistol. In most cases, this means removing the slide from the frame, the guide rod and recoil spring from under the barrel, the barrel from the slide, etc., so that you can lube and clean it. (For field strip instructions on the M1911, click here.) Usually, this does not include disassembly of the fire control mechanism. On the M1911 pistol, the field strip does include removal of the firing pin stop, firing pin, barrel bushing, and extractor from the slide.

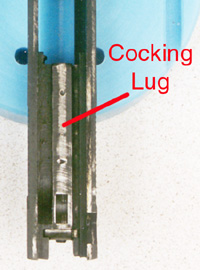
Examine all of these parts for rough spots and burrs in the metal, paying close attention to the areas where metal slides against metal in the following areas: the slide rails, the cocking lug on the underside of the slide which depresses the disconnector and cocks the hammer as the slide cycles, and the area inside the slide in front of the ejection port which locks down on the barrel. Examine the feed ramp in the frame (the polished crescent at the top of the magazine well on the M1911), the barrel throat and the chamber. On many pistols the feed ramp will be a part of the barrel. On the M1911 (and other pistols which allow for the removal of the firing pin, examine the channel which holds the firing pin to be sure that it is smooth and free of burrs. Some autoloaders like the S&W and Beretta pistols do not lend themselves to having their firing pins removed easily and on these it is best to leave this sort of thing to a professional unless you really know what you’re doing. Examine the bushing area of the slide. This is the area which holds the muzzle end of the barrel when the pistol is in battery. On the M1911, this is a separate part which should be removed during the field strip. Many other pistols have their “bushing” integrated into the slide. This bushing area where the barrel makes contact with the slide should be smooth and free of burrs.

Examine the feed lips of your magazines checking for catches. If you notice deep scratches on your spent brass, you may have some rough spots on the feed lips which can be smoothed down. I will generally use a stone to smooth the feed lips of a magazine. Be careful not to change the basic shape of the lips.

Touch is good. Often you can feel roughness using your fingertips which isn’t readily apparent to the eye. Do these moving surfaces feel smooth? They should. You shouldn’t feel roughness or catches as you run your fingers across them. Examine the feed ramp and chamber with a lighted magnifying glass. The little Kel-Tec had a rough spot in the chamber at about 5 o’clock just inside the breech. Feed ramps and chambers may have mill marks. You don’t need to remove every mill mark but if you suspect that an area might be rough enough to cause problems, you may want to polish it, gently, doing the minimum removal of metal that you can get by with. If your pistol design permits it, put just the slide on the frame without the barrel and spring, and move the slide back and forth. Does it feel smooth or does the slide seem to be binding or catching as it moves?

At this point you may determine that all of these surfaces are smooth and properly finished. Congratulations. You have bought yourself a quality handgun. Apply a light coat of lube to the moving surfaces and a bit of grease to the slide rails and cocking lug, and you’re good to go. I like Break-Free CLP and Rem-Oil for lubricant and Mil-Tec, Mil-Comm, and Wilson Ultimalube for grease, but I have also been known to use military surplus rifle grease in a pinch.

On the other hand, you may have discovered some rough spots or burrs and want to clean them up. Perhaps you just want to polish the feed ramp and chamber a bit. Even quality guns can sometimes have little rough spots that need to be dressed. Or, you may have an Eastern Bloc gun which is a good reliable shooter but has a lot of mill marks and roughness that you want to clean up. With some guns, like the little Kel-Tec, it is generally advisable to do what is called a “fluff and buff” on all of the internal moving surfaces to enhance reliability and function. (For the absolute best “fluff and buff” for the Kel-Tec P32, visit Golden Loki’s site at http://www.goldenloki.com/guns/keltec/prep.htm )

Basic Principles for a Successful Fluff and Buff:

  • Easy Does It
  • Less Is Best
  • Most of this is going to happen in time anyway
  • It is much easier to take metal off than to put it back on
  • Polish, don’t cut
  • It’s better to stop too early than too late

My Tools:

  • Variable Speed Cordless Dremel with polishing kit
  • Red Jeweler’s Rouge
  • DMT serrated knife sharpening wand
  • Extra fine steel wool
  • Curved-edge Arkansas white whetstone designed for sharpening gouges
  • Brownell’s 44/40 Instant Gun Blue for touch-up

Notes on the Dremel Tool:

The Dremel tool is a highly capable and flexible instrument, especially the new variable speed models. Remember also that a lot of guns have been ruined with Dremel tools. The old single-speed Dremels ran too fast for most gun work. I don’t use any of the abrasive bits on the actions of my guns; only the felt polishing heads. I have used the fine stone tips to take off sharps on the outside of Eastern Bloc guns, but that’s all. Some folks will use extremely fine sandpaper, like 600 or 1200 grit to do this sort of work. While this will work on some surfaces and edges, I prefer the Dremel or stones. Professional gunsmiths like stones for many of these tasks.

I like the polishing effect of the Dremel with felt pads and rouge. If you need a bit more grit, the polishing compound that comes with the Dremel polishing kit is OK. I got some wooden-shafted Q-Tips and cut them in half. They fit the collet of the Dremel perfectly and once some extra cotton is removed, they make excellent polishing tools for small areas like the inside of firing pin channels. If I have to take away more metal than the polishing head will do, I’ll use steel wool. If I have to do more than steel wool will take away, I’ll use a fine emery stone, but for a “fluff and buff” you really shouldn’t have to go further than this.

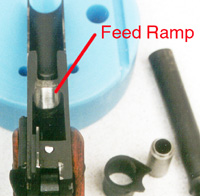
Feed Ramp
Feed Ramp

Polishing the feed ramp with a Dremel:

Use one of the felt polishing tips, either the bullet shaped pad or the small felt wheel. Use red jeweler’s rouge. Jeweler’s rouge is color coded. Red is the finest grit. It doesn’t even feel gritty. It’s the one jewelers use to polish watch cases and such. Take your time and go slow. Polish the inside of the chamber also, especially the area toward the top of the chamber where the bullets make contact with the barrel when they feed. Polish, but do not remove enough metal to change the shape of the ramp or chamber. The rouge will leave a residue which should be cleaned off with powder solvent or lighter fluid. If I find a particularly rough spot inside the chamber, I will tie a bit of steel wool on a ¼” oak dowel and carefully smooth that place down.

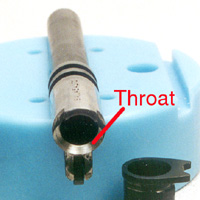
Throat
Throat

Gunsmiths have traditionally “throated” the beveled surfaces of the barrel where the bullet enters the chamber in the G.I. M1911 and M1911A1 pistols. This is done by extending the bevel up higher around the breech, rounding the angle where the beveled throat meets the chamber, and in some cases increasing the angle of the throat bevel. Kids, don’t try this at home. Unless you are a certified armorer, you can blow up your gun by taking away metal that supports the cartridge case. Polish this area with the greatest of care. Less is best. You do not want to change the shape of these critical surfaces. With most modern M1911-pattern pistols, this “throating” is done at the factory and you do not need to do more (The barrel in the picture to the right has already been throated). You may, however, need to do some polishing of the ramp, throat and chamber.

Slide Rails:

One of the traditional “accurizing” operations done on the M1911 is tightening the slide rails. This, along with carefully fitting a slightly over-sized bushing, gives Old Slabsides a tighter and more consistent barrel lock-up. On the slide rails, the tightening is done by peening the rails down a little with a hammer and then lapping them to smooth the contact surfaces. The lapping is done by putting a bit of polishing compound in the slide rail grooves and moving the slide back and forth on the frame until it smoothes down. For the M1911, a little tool was developed which locks into the slots which hold the bushing at the front of the slide. It’s just a little handle which makes it easier for the gunsmith to work the slide back and forth during the lapping process. The point of this little digression is that the slide itself is the polishing tool for the slide rails. You can dissolve a bit of jewelers rouge in lighter fluid and paint this fluid into the slide rails. Then put the slide on the frame and work it back and forth.

Some guns may require a bit more work on the slide rails. If you find burrs and catches in the grooves or the rails themselves, these should be carefully worked out with steel wool (or the ultra-fine sand paper). The DMT diamond sharpening wand is long and narrow and is excellent for hard to reach spots in the grooves. The red handled model is their fine grit and it does a good job. Use a very light touch because this instrument can quickly cut metal. The sharpening wand was particularly helpful with the tiny slide rail grooves of the P-32.

The objective with polishing the slide rails is to get a slide which moves smoothly without any grittiness or catches. A slide which is not being slowed by excess friction will feed ammo more reliably and cycle faster.

Cocking Lug
Cocking Lug

Other Areas of the Slide which may require attention:

On the slide, I polish the inside of the barrel bushing, the cocking lug which depresses the hammer when it cycles, and the area in front of the ejection port where the locking lugs are found on the M1911. I will also do a bit of polishing on the breech face. The firing pin channel should be checked for smoothness and given a light coat of oil. The firing pin hole in the breech face should be checked for burrs.

The Five Minute Trigger Job for the M1911

Well, not really, but this is a trick which will help smooth a trigger break which is slightly rough. Cock the hammer and dribble a drop of oil down the front of the hammer. The drop of oil will roll down the hammer onto the sear hooks. Cock and release the hammer a couple of times to get the oil into the sear hooks. Then (with the gun unloaded and ammo stored safely in an adjacent county) dry fire the gun while applying light pressure to the back of the hammer. Do this about ten times. Don’t get muscular with it. This will have the effect of lubricating the sear face and the sear hooks and polishing the sear face. It’s not a huge difference, but depending on the gun, it can result in a noticeable smoothing of the trigger break.

Break-in

The break-in of a pistol does not involve the mysticism and voodoo often afforded precision high powered rifles. Just take it to the range and shoot it, a hundred rounds or so, watching for any malfunctions or strange behavior. Then bring it home and clean it well and re-apply lubrication. If you get through five of these hundred-round cycles without a malfunction, you have a solid and reliable pistol. Be sure to test any new service ammo with 200 rounds before adopting it. At 1000 rounds you can consider the pistol fully broken-in. Don’t be afraid to dry fire your pistol. It’s good practice and, despite a lot of mythology which goes around about dry firing, it will not harm modern center-fire pistols.

Lubrication

Different models of guns have different needs for lubrication. M1911’s tend to like some oil and slide grease. Glocks and Berettas don’t seem to need much. Climate also plays a role in this equation too. In a very dry and dusty environment, grease can catch grit in a tightly fitted gun and hinder reliability. In a wet climate, a light coat of oil will guard the metal from rust. In an extremely cold climate, oil and grease can congeal and even freeze. A one-size-fits-all prescription for lubrication is just not possible. If you operate in a moderate climate, some protective oil and slide grease will most likely help the gun to function better and protect it from rust, corrosion and excessive friction on the moving parts. We recommend Mil-Comm grease, oil and cleaner.

Get a Grip

There is one part of autoloader reliability which is not hardware related: your grip. Even the most superbly reliable autoloader can be tricked into a malfunction by a weak grip. The physics of the situation is that an autoloader needs a firm support against which it can recoil. If you find that you are having jams on a pistol which other experienced shooters fire without malfunctions, it may be that you need a firmer grip on the gun. It may be as simple as remembering to grip the gun firmly when you fire it. It may also mean doing some exercise to strengthen your hands and arms. Squeezing a tennis ball, push-ups, and punching a bag all help. If you watch the master pistol shooters, you will notice that they don’t allow the muzzle of their guns to flip up much if at all. The more the pistols flips up and back during the recoil cycle, the greater your chances are of experiencing a malfunction.

The Single Best, Cheapest, Easy-To-Do Reliability Enhancement for the M1911 Pistol

If you shoot full-powered ammo, install an extra power recoil spring. I recommend an 18.5# spring for Government Models and 22# springs for Commander-length guns. This modification reduces or eliminates feed failures and reduces the battering on the frame of the gun. Some have said that it also reduces felt recoil, but I don’t notice much of a difference. Don’t do this if you’re planning to use light target loads because the light loads may not have enough power to cycle the slide completely. Another option is to save your original spring and switch it back in for the lower powered ammo.

Wrapping it up

The fluff and buff is basically a matter of helping along the natural effects of friction and wear, and it grows out of the primary observation that guns which are broken in well tend to be more reliable than pistols which are new. Many will say that a pistol is broken in at 500 rounds. My observation is that this should be considered a bare minimum. 1000 rounds, especially for a serious duty gun, is a better mark. As I said at the outset, very little of this cannot also be accomplished by running a couple thousand rounds through the gun. The trouble is that we don’t always have the luxury of firing 2K rounds before we put a gun into service. Be gentle with your polishing and let logic guide you and you won’t have any problems. It is entirely possible that you may buy a gun which will need none of this whatsoever. This is no cause for alarm. Sometimes a pistol just comes off the line right and nothing more is needed.

FTF (Failure to Feed) & FTE (Failure to Extract) Troubleshooting Guide

By Randy Adams

There are many things that can cause everyone’s favorite old warhorse to spit and sputter sometimes. And I am gonna’ try to go over a few possible causes. I’ve only been on the forum for a short time but this seems to be one of the more frequent posts. I am a working gunsmith located in Kentucky I’ve been building custom 1911’s for the better part of 7yrs. I have a website Fireblade Systems. I look forward to helping people realize their dream that is a custom 1911. Feel free to email me if you have any questions. Well enough of that. On with the FTF & FTE.

Failure to Feed (FTF)

Ammunition
Are you using factory loads or reloads?
Is the shell casing damaged? (dents, dings, rough spots)
If using lead bullets are they deformed? out of spec? rough casting?
Bullet length?
Primer seated?
Case diameter in spec?
Are you using hollow points in an un-throated barrel?
Is it the correct caliber ammo? (hard to believe but it happens)

Magazines
Spring underpowered, rusted, broken?
Magazine dirty?
Follower damaged? broken, bent, cracked?
Feed lips bent?
Are the magazines fully seated?

Slide
Breech face rough, pitted, burred, out of spec?
Burr on the slide rails? (This is sometimes hard to diagnose especially with the slide assembled. Disassemble the slide install it on the frame and slowly work it back and forth. Do you feel a rough spot? If so stone or file the rough spot just enough to smooth up.)
Extractor tension too tight? (not allowing the round to snap in place and seat itself)
Is the recoil spring correct weight for the ammo you are shooting? Is it weak?
Broken? Binding?

Barrel & Frame
Do you have the required 1/32 gap between the feed ramp and the barrel ramp?
Is the feed ramp rough?
Is the chamber dirty? Rusted? Pitted?
Has the contour of the feed ramped been changed? (Excessive polishing)

Failure to Extract (FTE)

Extractor tension weak?
Extractor claw broken? Rounded off?
Is the chamber tight? pitted? rusted?
Is the ejector damaged? too short or broken?
Is the ejector too long?
Has the extractor been properly tuned?

A lot of the things mentioned in the FTF section apply to the failures to extract and eject. This is not everything that can cause these problems but it is somewhere to start. If you find the problem but are unaware of the solution you can drop me an email or do a search on the forum for a more specific problem.

Randy Adams
Fireblade Systems

www.firebladesystems.com
Specializing in Custom 1911s, Tactical Shotguns and Performance Glocks

Dropping the Slide on an Empty Chamber

Q: I have read here that dropping the slide on an empty chamber with a 1911 style pistol can damage a quality trigger job, and therefore the slide should be eased forward. Two questions: (A) Why does it do that? (Or maybe HOW does it do that?) and, (B) Why doesn’t it do it if there is a round in the chamber?

A: It does it because when the slide slams home on an empty chamber it jolts the entire gun, bouncing the sear engagement point on the hammer face, which is the area that you just paid to have polished to a mirror surface. When the gun is picking up a cartridge (loading from the magazine) the slide is slowed considerably and this reduces the impact and thus reduces the jarring effect on the hammer/sear interface. Add to this that the proper way to do all this (on this type gun – good target trigger) is with the thumb holding the hammer down and the trigger pulled back to the full engagement position (which locks up the action and stops any jarring effect). Since this is what happens when you fire the gun (minus the thumb on the hammer of course) a properly working gun is safe. The thumb on the hammer is just “insurance”.

Bob C. NRA Endowment USN (Ret)

See Also “Holding the Trigger Back While Loading an M1911 Pistol”

Is “Cocked and Locked” Dangerous?

Cocked and Locked 1911

By Syd

Q: The one and only problem I’ve ever had with the classic 1911 is having to carry “cocked & locked.” In your opinion, are the double action only models offered by Para-Ordnance the way to go when safety is concerned?

There are really two parts to your question so I’ll deal with them separately.

First, yes the P-O LDA is an excellent option when the cocked and locked 1911 is a problem. Charles Riggs wrote a nice article for me on the LDA which addresses this:

https://sightm1911.com/lib/review/para-ord-745.htm

Second, I believe that the concern about the safety of the “cocked and locked” (condition 1) pistol is more a matter of perceptions than reality. It looks scary. When you’re new to the 1911, it feels scary. I started out with wheel guns and it took me some time to get used to cocked and locked. But, given the huge number of M1911 pistols which are out there in service, you would think that we would hear more about accidental discharges if this were a problem. The fact is that we don’t because they don’t go off by themselves. I have only heard one story from one police officer who claimed one went off in his holster when it bumped against a banister as he descended a set of stairs, but when I pushed him for details, he refused to say anything more. He wouldn’t tell me the kind of holster, if the gun had been modified, its state of repair or any other circumstances. This led me to believe that he was either blowing smoke or there was something about the gun he didn’t want to tell me.

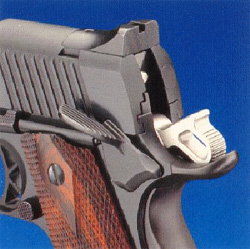
Safety On 1911
Safety On 1911

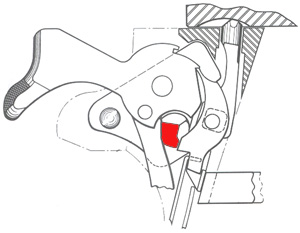
What do we mean by “cocked and locked”? The M1911 pistol is loaded by inserting a charged magazine and racking the slide. This action chambers a cartridge and cocks the hammer of the pistol. The thumb safety is then pushed up toward the sight. This “locks” the pistol. The safety is on and the slide will not move. Inside the gun, a piece of the safety rotates (red area in diagram) and blocks the base of the sear which prevents the sear from releasing the hammer. If the sear hook on the hammer were to break, the sear would be captured by the half-cock notch preventing an accidental discharge. The stud that locks the sear will also not allow the hammer to fall if the safety is engaged.

But what about the cocked and locked pistol taking a hard hit on the hammer? Could it go off then? Listen to this report from Terry Erwin:

“About ten years ago, I was working as an armed-plain clothed-security officer. During a struggle with an arrested subject the Combat Commander I was carrying cocked and locked, holstered in a Bianchi “Pancake” on my strong side hip, struck the center door jam of a set of double doors. The center door jam was knocked loose, and two belt loops were torn off of my jeans. The hammer was bent inward and the safety would not move. A gunsmith had to press out the safety, hammer pin, and sear pin. The edge of the sear had cracked off, and a piece of one hammer hook also cracked off. The gun did not discharge upon that impact. I have carried several Colt’s, including that repaired Commander for most of my adult life, and have never once worried about the weapon (myself or someone else is a different story, but not the gun).”

The 1911 is a single action semi-automatic pistol so it has to be cocked in order to fire. People deal with this in one of three ways: cocked and locked (condition 1), or they chamber a round and carefully lower the hammer (condition 2) so they have to thumb cock the gun to fire it, or they carry it with an empty chamber and rack the slide when they bring it into action (condition 3). I would advise either condition 1 or 3 for home defense, but not condition 2. I don’t advise condition 2 under any circumstances. (For more discussion on the conditions see “The Conditions of Readiness”) If you are only using the gun for home defense, there is nothing wrong with leaving it in condition 3 with a loaded magazine but with an empty chamber – as long as you have the presence of mind to load the weapon under stress. (Don’t give me a “duh” on that one because weird things happen to one’s mind when someone is trying to get into your house at 3 AM).

When the gun is cocked and locked, the sear is blocked from releasing the hammer. Further, unless a firing grip is on the pistol, thumb safety swept off, and the trigger is pulled, the gun will not go off. For my money, this is much safer than a Glock or some of the other new pistol designs which have no external safety. The Glock, by the way, is also pre-cocked which is why it can have a much lighter trigger than a real double action gun. It could be said that the Glock is “cocked and unlocked” which is called “condition zero” with the M1911. Anecdotally, we hear of many more “accidental discharges” with Glocks than with M1911 pattern guns. The 1911 has two manual safeties. It may look scary, but it is really much safer than many current designs.

If an M1911 has been butchered internally, all bets are off, and I have seen a couple like that. But if the gun is in good repair, it is safe and will not go off unless the thumb safety is swept off, a firing grip is on the handle, and the trigger is pulled. If you buy a used M1911 pattern pistol, be sure to have it checked out by a competent gunsmith just to insure that the gun has not been modified or made dangerous by a tinkerer and that it is in good working order.

A sideline: of the pistols I have carried, the M1911 is the only one I carry with the safeties engaged. I carry S&W and Beretta DA/SA guns with the safety off. Glocks and wheel guns don’t have a safety at all (and no, I don’t consider the trigger flange on the Glock a real manual safety). In this respect, the cocked and locked M1911 is the safest pistol. It is unique in the fact that it has not one but two manual safeties which have to be acted upon to make the gun fire.

Now, to argue the other direction for just a second, do I feel safer with a true DA/SA with a firing pin block and a manual safety like a S&W or Beretta? Yes, in an absolute sense, I do when I’m in the world of theoretical possibilities, but again, I think this is more a matter of feeling than reality. Some weird combination of events could conspire to take the safety off, push down the grip safety and pull the trigger all at the same time, but I can’t visualize what that circumstance would be. Nevertheless, when I’m backpacking and I know the gun may have to ride in my backpack and flop around in a tent with me, I will often carry a S&W DA/SA just because some of these strange possibilities come to mind. For the purposes for which a gun is needed, I feel safer with the M1911 because I know I’m going to shoot it better and faster than these other options.

I have seen “accidental discharges” with M1911’s, but without exception they have been instances in which the finger was on the trigger or the fire control group had been modified by an incompetent. I have yet to document a single case in which an M1911 simply experienced a catastrophic failure and went off while cocked and locked. And I do hunt for such stories because this is a concern for a lot of people.

Another interesting “safety feature” of the M1911 was first observed by Massad Ayoob. In the event that a bad guy might get your gun away from you, confusion about the controls of the cocked and locked M1911 could cause him enough hesitation to give you a chance to either get the gun back or flee. The current generation of thugs have cut their teeth on double action semi-autos and revolvers and many do not know how the M1911 operates. Ayoob tested this with people who were unfamiliar with pistols by giving them unloaded pistols of various designs and measuring how long it took them to figure out the controls and make the hammer drop. The M1911 proved to be considerably slower to fire than double action guns in the hands of those who are unfamiliar with the gun.

Q: Is the cocked and locked M1911 a problem for people who are new to firearms and want to keep one for home defense?

In my opinion, cocked and locked does not present either a safety or handling problem. In fact, I would be inclined to argue the other way, that it is very intuitive and simple, and very quickly brought into action. 90 years of successful service tends to bear this out. All you have to do is to sweep the thumb safety down with your thumb and the gun is ready to fire. It is a natural motion and people learn it quickly.

Other issues come into play when you’re considering keeping an 1911 loaded for home defense, such as if you have small children in the home and how much access your friends have to your home, but there is nothing inherently dangerous with having a cocked an locked gun at the ready. If you have really small children who are too young to train on firearms safety, then condition 3 – empty chamber – is definitely the way to go because the child will not know to rack the slide to load it and they will lack the strength in their hands and arms to do it. If you are a very social person who has a lot of parties and people running through your house all the time, then you really should wear it, concealed of course, so that the pistol is under your immediate control and you don’t have to worry about someone finding it and doing something stupid. If that’s not possible, lock it up or find a smarter circle of friends who won’t go through your stuff when you’re not looking.

Finally, the real cure for cocked and locked anxiety is to get “un-new” to the gun. Shoot it, get used to it, learn it so that you don’t have to think about it. Familiarity will dispel that anxiety. Get some training if at all possible. Pistols really require some training and practice to use effectively. A good training session with a qualified professional trainer will help to separate the fact from the fantasy about what you can actually do with your pistol when the chips are down.

I feel that the 1911 is the fastest, best shooting pistol which has ever been built, but that doesn’t mean that there aren’t some other good designs out there. You should be comfortable with your gun, and if you just can’t get over that fear about the cocked hammer, find another gun that feels good to you. I love the 1911 because of the way it shoots, but I had some nervousness with them when I was new to them. Practice and familiarity made it go away.

“Due to misplaced concerns about safety and liability, the police have shunned the Condition One (Cocked and Locked) SA auto, mostly in favor of DA autos that aren’t any easier to use than a DA revolver. Claims that the SA auto is unsafe or requires special training are hogwash, something that too many people accept without challenge. And if you don’t believe it, come see me at any CTASAA course and I’ll prove it to you.” – Chuck Taylor