©2000 , John L. Marshall
The 1911 pistol, John Browning’s large-caliber pistol triumph, is both lauded and condemned in the firearms world. It’s lauded for its power, simplicity, excellent trigger, and reliability under adverse conditions. It’s condemned as being antiquated, heavy, over-powerful, and not always reliable with specialty ammo. Some say it’s not optimally safe in the hands of the untrained, but I’d have to say that NO pistol is safe in the hands of one who is untrained it its use.
Yet in spite of some detractors, the 1911, or Government Model, is the most ubiquitous combat pistol on the planet, being made by scores of manufacturers and spawning a huge aftermarket accessory industry all its own. As a combat or self-defense arm, it is THE pistol of choice of the professionals. Ask any expert, and he or she will tell you that in the hands of one schooled in its use, a properly-set-up 1911 pistol in .45 ACP caliber is unparalleled in efficacy.
Still, few firearms professionals will use a 1911 just as it comes from the box. The prime consideration in a self-defense pistol on which you must stake your life is reliability, and the 1911s the experts carry have been tweaked to make them as close to 100% reliable as human hands can make them. Although the classic 1911 design is extremely reliable with G.I. hardball ammunition, reliability with modern ammo of softpoint, hollowpoint or semiwadcutter design can be a sometimes thing. To its credit, the original design of the pistol will digest some pretty wild ammo designs almost all the time, but “almost all the time” is definitely not good enough when you must stake your life on a handgun. It must work all the time, every time with whatever you want to feed it!
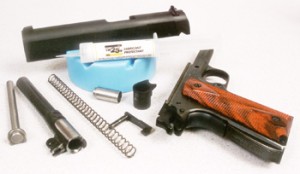
Here we will examine the things you, as the owner of a new-in-the-box 1911 can do to make it ultimately reliable. Most of the things we will discuss can be done with hand tools, or in some cases a high-speed miniature hand tool such as the Dremel. While these techniques require a modicum of skill and care, they are not beyond the realm of most amateur craftsmen. We will examine each part of the 1911 design which can be modified for optimum reliability, and why the modifications are considered desirable.
The Barrel
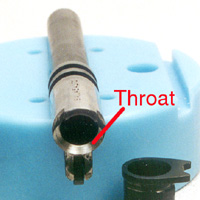
Most barrels of modern manufacture (since the middle 1980s) come already “throated,” or widened, in the ramp area. This is the best type of barrel to start with. Earlier barrels have a narrow feed ramp which is designed to feed hardball ammo only. These barrels are best throated first by a competent gunsmith who really understands the 1911 design. Although proper throating is not beyond the realm of a competent amateur with a Dremel tool, the possibility of ruining an otherwise good barrel demands that this task be left to the professional. However, once the barrel is properly throated, or if you have one that has come from the factory already throated, there are still some things you can do to the barrel to enhance reliability.
First, note the transition area between the barrel feed ramp and the inside of the chamber. If this area is sharp, it must be lightly curved, or rounded, so that the round will feed smoothly over that “ledge.” This can be accomplished with a file or a Dremel tool. Take it easy here – the object is not to extend the ramp into the chamber area, but simply to lightly round off that sharp edge. Then the filing or grinding marks can be smoothed and polished with successively finer grades of sandpaper, finishing off with crocus cloth and a polishing compound such as “Flitz” on a cleaning patch or a Dremel polishing tip.
Next, note the hood of the barrel. In earlier barrels, the part of the hood that contacts the slide was perfectly flat, perpendicular to the axis of the barrel. Later barrels have a proper 45-degree bevel on the lower half of this hood contact area. The purpose of this bevel is to eliminate a “catch point” for semiwadcutter bullets which would prevent proper chambering. If that bevel exists on your barrel, all you will need to do is polish the bevel, using the same technique mentioned before, using successively finer grades of sandpaper and/or the polishing head of your Dremel tool with a polishing compound. If the bevel does not exist, it is an easy task with a Dremel tool to grind the bevel. Take care to maintain a 45-degree inward angle, following the curve of the barrel hood, and to take off no more than 50% of the surface area of the hood where it contacts the barrel. Then finish by polishing this bevel area.
Now look at the area where the hood mates up with the chamber area of the barrel. There should be no sharp edges here. If there are, take a small rat-tail or half-round file and lightly round those sharp edges. Then polish the filed area.
Now place the barrel into its slot in the frame and push it back and down until the link support legs contact the back of the slot in the frame. The barrel should rest on the curved support surfaces of the frame. Note the gap between the bottom edge of the feed ramp in the barrel and the forward edge of the feed ramp in the frame. This gap should be at least 1/32nd of an inch, and could be as much as 1/16th of an inch. If there is a smaller gap than this, (or no gap at all), the chambering cartridge can and probably will hang up on the lower lip of the barrel’s ramp. That gap is absolutely crucial to smooth chambering. If the gap is not at least 1/32nd of an inch, the solution is to file the bottom of the barrel feed ramp back until that gap is achieved. Then the ramp is re-shaped carefully with files or a Dremel grinder so that the barrel feed ramp is once again close to the bottom of the barrel. Be careful – do not extend the ramp much, if at all, deeper into the chamber, and keep the same upward angle as before. In the 1911 design, the ramped barrel leaves a portion of the case unsupported, and if the ramp is too deep, it increases the possibility of a case blowout. This could have serious consequences for the pistol and for you!
The next step is to bring the ramp area of the barrel to a mirror polish. This can be accomplished by hand, using finer and finer grades of sandpaper, crocus cloth, and then finishing with Flitz. Again, the objective is simply to polish, not deepen the ramp into the chamber area.
When a round is fed into the chamber from the magazine, it comes up the frame and barrel ramps, and then deflects off the roof of the chamber of the barrel, straightening itself out for the final direct push into the chamber. For this reason, it is advantageous that the inside of the chamber be very smooth so as to allow little or no friction as the nose of the bullet deflects downward. Here again, the answer is polishing. You do not want to widen the chamber out of spec, but you do want to take off any roughness. The felt polishing head of the Dremel and some Flitz polishing compound is perfect for this task, or you can do the same thing with a tight-fitting cleaning patch and Flitz, pushing it in and out of the chamber area. Do not ride up over the headspace ledge in the chamber; this should remain clearly defined and relatively sharp. Look at your work with a magnifying glass, and stop when you have a smooth chamber surface.
The locking lugs on the barrel need a bit of attention. The forward edge of each locking lug should be lightly “cut” or chamfered with the edge of a file. Just a little does it. Follow the curve around each lug. Polish these cuts with fine sandpaper. The objective here is to help the locking lugs cam up into their seats in the slide smoothly and easily.
This completes the necessary work on the barrel. The main objective is for the chambering cartridge to have a smooth, glass-like surface to work against wherever it contacts the barrel on its way in.
The Frame
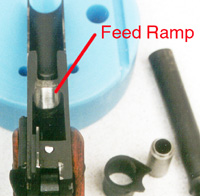
There is one main area of the frame which must be addressed with respect to reliability. This is the feed ramp, which in most factory-fresh pistols is pretty rough, with plenty of tooling marks. The objective here is to polish the ramp until there is a very smooth surface for the chambering round to work against. Take great care not to change the angle of the ramp, and to maintain a fairly sharp edge at the upper lip of the ramp. In some cases, if the tooling marks are pretty deep, it’s not wise to try to take down the ramp until the tool marks disappear completely – just polish-flatten the marks out a bit. Keep in mind that you absolutely must have that 1/32nd of an inch gap between the frame ramp and the lower edge of the barrel. Pistols have been absolutely ruined by improper shaping and polishing of the feed ramp, and the only solution is either a new frame or inserting and welding a new feed ramp surface. Both solutions are expensive, so be careful! Again, the standard technique of using successively fine grades of sandpaper, crocus cloth, and polishing compound is utilized. Your finger makes a good backing for the polishing medium; I advise against using a dowel or other hard object, as this may alter the shape of the ramp unduly.
Many “experts” recommend the use of a Commander-length extended ejector in the standard 1911. By the way, the Commander ejector does not fit without modification, but aftermarket extended ejectors are designed which fit the standard 1911. The purpose of this modification is to get the fired case out of the pistol earlier in the recoil stroke, thus helping to prevent “stovepipe” jams. In actual practice, I’ve never had a problem with the standard ejector in full-size 1911s. The disadvantage of an extended ejector is that it may not always allow the ejection of loaded rounds, and you’d have to let them extract carefully down into the magazine well. If you must have an extended ejector, consider re-shaping the ejection port to allow clearance of ejected loaded rounds. On the Commander-length and Officer’s-length pistols, the extended ejector is a good idea, since the recoil stroke of the slide is shorter. Most of these pistols come standard with an extended ejector anyway, so it’s a moot point. Extended ejectors do hustle the fired case out of the pistol muy pronto, and every bit of hustle helps with the abbreviated pistols. It probably can’t hurt the full-size pistols except for the loaded-round problem, but it’s not really necessary, either.
The Slide
There are “old” slides and “new” slides. Older slides have the ejection port cutout fairly high in the slide, so the depth of the cutout is just below the dividing line between the curved upper portion of the slide and the flat side. Newer slides have the ejection port cut much lower, anywhere between .465″ and .480″ to the bottom of the slide. This allows the ejected case an easy exit, and reduces “dings” in the fired cases. Some slides, such as the Colt Gold Cup and the newer “enhanced” slides, also have a clearance cut, or “flare” milled into the rear edge of the ejection port. This is to allow the ejected case to roll over backwards easily as it exits the port. It also reduces the likelihood of a “stovepipe” jam where the ejected case is caught in the ejection port. Not much needs to be done to the newer lowered and flared ejection ports other than polishing the inside lower surface of the port where there is a bevel. If you have an older slide where the distance between the bottom of the port and the lower edge of the slide is more than .480″, then it’s advantageous to lower the port to at least that depth. You can have this professionally milled out, or you may choose to do it yourself, using the aluminum oxide grinding wheel of a Dremel tool. With the stripped slide in a vise, move the grinding wheel forward and back along the bottom edge of the port, taking care to take full-length strokes evenly. Let the high-speed wheel do the work; use very little downward pressure. Take great care to keep the successive cuts parallel with the bottom edge of the slide. Do not cut into the lower rear of the port to the extent that you expose the head of the extractor. Once the bottom edge of the port is evenly lowered to .480″ or a bit less from the bottom edge of the slide, bevel the inside lower edge of the port at an angle similar to the one that was there when you started. The Dremel grinding wheel can accomplish this easily. Use the wheel or a file to carefully chamfer the outside lower edge a bit so that it is no longer sharp. The rear of the ejection port can now be flared using the conical grinder of the Dremel tool; use photos or a newer slide as a guide, and again, don’t get into the extractor area so as to expose its head. The next step is to polish the inside bevel along the lower edge of the port, the flare area and the outside edges of the port. If you’ve been careful, cold blue can touch up a blued slide, and stainless slides require no refinishing.
The next area of the slide that requires attention is the face of the breech. In most pistols, you will find extensive tooling marks. These can grab at the rear of the cartridge as it slides up under the extractor, and the friction may be enough to prevent chambering. Your objective is to polish the breech face to smooth out or even eliminate the tool marks. Care must be taken not to remove too much material, as this would push headspace beyond the allowable maximum. If the tool marks are very deep, you can only smooth them out a bit. Strip the slide, and then use a small, flat file to do the initial work. Then using the file as a backer, use successively finer grits of sandpaper to achieve a smooth surface. Finish with Flitz on a patch. Take care not to change the angle of the breech face, which should be perpendicular to the base of the slide.
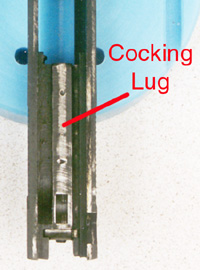
Note the firing pin hole in the face of the breech. This should be lightly chamfered, or beveled. A sharp edge here can catch the edge of a chambering cartridge. I’ve used one of the conical heads of a Dremel, held in the firing pin hole by hand, and rotated with the fingers to achieve this chamfer. It doesn’t take a lot; just enough to remove any sharp edge.
Now look at the area of the slide where the disconnector rides; the ridge that runs along the base of the slide back of the breech face. Most pistols will show tool marks here, and these should be smoothed and polished. If the tool marks are deep, don’t even try to polish them out all the way. Simply smooth them up a bit. This gives an easier ride for the disconnector as it presses against the base of the slide, and will help prolong the life of the disconnector. Finer and finer grits of sandpaper, applied with a finger, and then Flitz do the trick. If you reduce the depth of the disconnector track too much, you will have real problems, so go lightly here.
Next, just as you chamfered the forward edges of the locking lugs on the barrel, you will also want to lightly chamfer the forward edges of the locking grooves in the slide. Use the edge of a triangular file to “cut” these edges slightly and then smooth up the chamfering with finer grits of sandpaper. The slight chamfers on the barrel and in the slide will help to make a smooth lockup with minimum resistance.
The Extractor
A properly shaped and tuned extractor is crucial to reliability in the 1911 pistol. Most factory extractors and many aftermarket extractors need attention to achieve the optimum in reliability
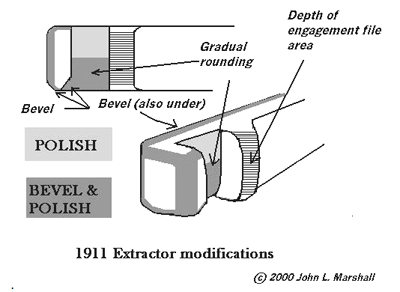
The first area of attention is the extractor groove itself, where the rim of the cartridge rides up into the groove from below. The extractor, when properly fit, does not “snap” over the rim of the cartridge, but the cartridge pushes up from below as it is fed from the magazine. One of the surest ways to ruin an extractor is put a round directly into the chamber, and then drop the slide. This forces the extractor to snap over the rim, and in time will ruin the extractor’s shape or break it.
The extraction groove must be beveled at the bottom of the groove so that the rim of the cartridge is cammed gradually into the groove. In this way, the cartridge rim will more gradually push the extractor back to tension it over the extractor groove in the cartridge and it can slide up more easily. This bevel should run from the bottom edge of the extractor groove up to the midway point in the extractor’s groove. The forward inside edge of the extractor groove should be beveled out to form a slight angle; since the cartridge is at an upward angle when it feeds, this allows the rim to slide into the groove at the proper angle. The angle of the majority of the inside extractor claw should not be altered by filing or polishing. It should remain at 90 degrees or even have a slight inward grasp. The lower edge of the extractor claw should be beveled and rounded; the forward outside edge should be rounded. The top and bottom rear edges of the body of the extractor should be beveled for about an inch and ½ so as to allow “wiggle room” for the extractor within its hole in the slide. Then the tip of the extractor and the inside of the extractor groove should be polished. The initial shaping is done by small files; the polishing is done with fine sandpaper and Flitz.
Proper tensioning of the extractor is vital to reliability. Too much tension and chambering will be severely impeded or prevented. Too little tension, and extraction and ejection will be weak or non-existent. An old gunsmith trick to test the tension of the extractor is to remove the slide from the pistol, and push a round of ammo up under the extractor from below. With proper tension, the round should be held in place regardless of how the slide is turned, yet when the round is moved downwards from its center position about 1/10 of an inch, the round should drop off.
Tension is adjusted by removing the extractor, reversing it in the extractor hole in the slide, and pressing sideways one way or the other to increase or decrease tension. The depth of the extractor’s protrusion into the case area is controlled by removing a slight amount of metal from the inside of the rounded protrusion just back of the extractor claw with a file.
Recoil Spring
The correct recoil spring poundage is important to the reliability of your pistol. Too light a spring will batter the pistol and weaken the chambering process; too heavy a spring will result in failures to extract and eject, or in “stovepipe” stoppages. A too-heavy spring is also rough on the extractor. A too-quick closing of the slide will force the extractor over the rim of the cartridge, rather than allowing the cartridge to move up under the extractor in a controlled feed. It also has the effect of battering the slide stop unduly. The stock recoil spring in a standard 1911 is rated at 16 pounds. Moving up one notch to 18 ½ pounds will be about right for most pistols shooting hardball and other full-power defense ammo. Anything heavier is too much. Be sure to test the new recoil spring by shooting the pistol one-handed and loosely. It should function positively. If not, go back to the 16-pound spring.
An extra-power recoil spring also aids in preventing the slide from opening too soon. You may have seen “skid marks” on primers, caused by the firing pin still being extended against the primer when the slide unlocks. Eventually, this could break the firing pin. The use of a heavier recoil spring often cures this problem.
Commander-size pistols do well with a 20-pound spring for full-power ammo, and Officer’s-size pistols utilize a 24-pound spring well for the same purpose. As long as it’s not overdone, a stiffer recoil spring will aid in positive chambering and lengthen the life of the pistol. If the slide becomes difficult to retract using a stiffer spring, consider using one of the progressive-rate springs which are easier to get started at the start of the slide’s recoil stroke. The jury is out as far as the so-called “shock buffers” are concerned. These little polymer doughnuts slip over the recoil spring guide and cushion the shock of the slide banging against the end of the recoil spring guide. To this extent they are good, but they must be replaced regularly as they get chewed up. Having one disintegrate inside a defense pistol in a pucker situation is not something I would want to have happen, and for that reason I don’t use them. Likewise, there is controversy over the use of a full-length recoil spring guide in a defense pistol. Theoretically, the full-length guide keeps the recoil spring from kinking in its channel, and assures uniformity in the recoil stroke. It has the disadvantage of preventing a “press check” of the pistol, and of preventing one-handed racking of the slide by pressing the recoil spring plug against a shelf, shoe or other solid object. It is doubtful if the full-length guide increases accuracy, but you may gain some life from the recoil spring. Recoil springs should be replaced about every 2-3 thousand rounds anyway, as they gradually lose their strength over time and usage.
Firing Pin Spring
I highly recommend the use of an extra-power firing pin spring in every 1911 pistol. In series 70 pistols, it helps guard against an inadvertent discharge if the pistol is dropped muzzle-down on a hard surface. It also retracts the firing pin more quickly to help avoid primer “skid marks.” Plus, it’s extra insurance against the firing pin stop dropping down at the end of the recoil stroke and tying up the pistol or putting it out of action completely.
Even with a low-power mainspring (hammer spring), a heavier firing pin spring will allow the firing pin plenty of momentum for sure ignition of the primer. The mainspring on 1911s was designed with plenty of overkill, and even with a 30% reduction in the strength of the mainspring, a heavy firing pin spring is still a fine thing and will usually work quite satisfactorily.
Slide Stop
The slide stop is often overlooked in reliability work. Once in a while the slide stop will activate during a string of fire, locking the slide back even though the last round has not been expended. There are two causes for this. One is that the nose of the ammo being used in the gun will lightly tap the projection of the slide stop inside the magazine well, popping it up prematurely. The solution here is to lightly file back the projection where it is getting “bopped,” but not enough so the follower doesn’t activate it properly after the last round is fired.
The second cause is usually an overweight slide stop. The “extended” slide stop is particularly notorious for this. The slide stop simply pops up from its own inertia as the pistol recoils. An extended slide stop is the answer to a non-existent question, and no serious defensive handgunner should use one (slide stop operation should be with the weak hand in a reload situation, not the shooting hand). So if you are tempted to fancy up your pistol with an extended slide stop, don’t. Some aftermarket slide stops are designed to be less bulky than the factory product. This keeps the mass of the part down and helps to prevent premature pop-up. A trick you may use to help prevent the phenomenon is to file a transverse groove with a small triangular file in the back of the slide stop where it meets the slide stop plunger in the down position. Any tendency for the slide stop to pop up is countered by the pressure of the plunger in the groove. If properly done, it should not impede the upward movement of the stop after the last round is fired when it’s activated normally by the magazine follower. If you want to get fancier, a Dremel tool can be utilized to grind a slight “dimple” in the slide stop at the same location, and it serves the same purpose.
Firing Pin Stop
While an extra-power firing pin spring will usually prevent it, occasionally you will have a firing pin stop disengage from its slot in the rear of the slide, either dropping down to tie up the slide, or coming off the pistol completely. The quick fix is to utilize a sharp punch and hammer and throw up some burrs on the inside of the firing pin stop. This will make the stop fit more tightly in its groove in the slide and the extractor. A better fix is to buy an oversize aftermarket part which can be fit tightly and closely by filing. Be sure to get the right part – series 80 pistols utilize a different stop from their series 70/G.I. cousins.
Magazines
A good magazine is the heart of any reliability work on the 1911 pistol. It’s as integral a part as the slide or frame. Good magazines aren’t cheap; my advice is not to scrimp. Get the best you can. Wilson-Rogers mags have an excellent reputation, and some people swear by Chip McCormick’s Power Mags. Either should serve you well. Be sure to test-fit the mag in your particular gun before you buy it. It should lock the slide back when empty, and drop free of the gun when you hit the magazine release button. Polish the insides of the feed lips. If you will look at the edge of the magazine at the top, you will see a rub mark where the magazine release bears against the side of the magazine as it’s pushed home. File a slight bevel at the top of the mag where the rub mark begins. While this doesn’t bear on reliability, it does ease the insertion of magazines during a speed reload, and prevents undue wear in a critical area. Be sure to test-fire each magazine in your gun with your load of choice; it should function 100%. Maintain your magazines by disassembling them and cleaning them periodically. Use no oil inside the magazine; it will only attract dirt and powder debris. Wipe the magazine spring with a lightly-oiled rag; that’s all the lubrication required. Use stainless mags in preference to blued ones; they resist rust far better, and rust inside or outside of a magazine is your enemy. Magazine springs eventually wear out, although many a tale is told of filled-to-capacity mags working fine after years of being loaded. If you begin to experience “ride-over” failures to chamber, suspect the mag spring and either replace it or get a new magazine.
The magazine spring must be stiff enough to pop the next round up quickly into the path of the rapidly-reciprocating slide. This is usually more of a problem with the compact 1911s than the full-size models, as their slides don’t retract as far. You’ll see a “failure to chamber” malfunction most often with the smaller pistols on the last round from the magazine. Extra-strength mag springs are commercially available; those from Wolff are praised. See if using one doesn’t cure the problem.
Again, all the above work is well within the ability range of a careful craftsman, and once your 1911 is modified as specified, it should work all the time, every time. Having your 1911 go “bang” every time you pull the trigger is crucial if you want to use it as a defense pistol! I hope this summary of reliability secrets has been helpful to you, whether you want to undertake the work yourself or have it performed by a gunsmith.

Comments, suggestions, contributions? Let me know