By Syd

First, let me say a couple of things about what this article is not. It’s not about trigger jobs and it’s not about repairing problems in troubled guns. For full reliability tuning of the M1911 pistol, see John Marshall’s superb “Reliability Secrets”. Second, there is very little in this article which cannot be accomplished by running a few thousand rounds through the pistol. What we’re talking about here is smoothing moving surfaces, reducing friction and insuring trouble-free operation of a new handgun. While I’ll talk about M1911 pistols, this process isn’t limited to that gun alone. The inspiration for the article actually came from the break-in of a Kel-Tec P32.
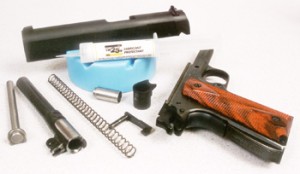
The first thing you want to do with your brand new box-stock pistol when you get it home is to open the box and RTFM (“Read The Flippin’ Manual” … well, that’s not really what it stands for, but you get the idea). Understand how to do a basic field strip on the pistol. In most cases, this means removing the slide from the frame, the guide rod and recoil spring from under the barrel, the barrel from the slide, etc., so that you can lube and clean it. (For field strip instructions on the M1911, click here.) Usually, this does not include disassembly of the fire control mechanism. On the M1911 pistol, the field strip does include removal of the firing pin stop, firing pin, barrel bushing, and extractor from the slide.
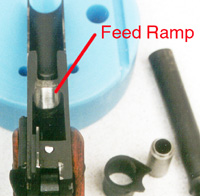
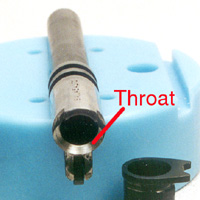
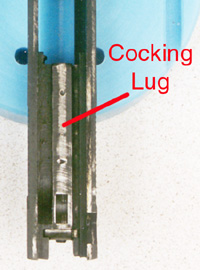
Examine all of these parts for rough spots and burrs in the metal, paying close attention to the areas where metal slides against metal in the following areas: the slide rails, the cocking lug on the underside of the slide which depresses the disconnector and cocks the hammer as the slide cycles, and the area inside the slide in front of the ejection port which locks down on the barrel. Examine the feed ramp in the frame (the polished crescent at the top of the magazine well on the M1911), the barrel throat and the chamber. On many pistols the feed ramp will be a part of the barrel. On the M1911 (and other pistols which allow for the removal of the firing pin, examine the channel which holds the firing pin to be sure that it is smooth and free of burrs. Some autoloaders like the S&W and Beretta pistols do not lend themselves to having their firing pins removed easily and on these it is best to leave this sort of thing to a professional unless you really know what you’re doing. Examine the bushing area of the slide. This is the area which holds the muzzle end of the barrel when the pistol is in battery. On the M1911, this is a separate part which should be removed during the field strip. Many other pistols have their “bushing” integrated into the slide. This bushing area where the barrel makes contact with the slide should be smooth and free of burrs.
Examine the feed lips of your magazines checking for catches. If you notice deep scratches on your spent brass, you may have some rough spots on the feed lips which can be smoothed down. I will generally use a stone to smooth the feed lips of a magazine. Be careful not to change the basic shape of the lips.
Touch is good. Often you can feel roughness using your fingertips which isn’t readily apparent to the eye. Do these moving surfaces feel smooth? They should. You shouldn’t feel roughness or catches as you run your fingers across them. Examine the feed ramp and chamber with a lighted magnifying glass. The little Kel-Tec had a rough spot in the chamber at about 5 o’clock just inside the breech. Feed ramps and chambers may have mill marks. You don’t need to remove every mill mark but if you suspect that an area might be rough enough to cause problems, you may want to polish it, gently, doing the minimum removal of metal that you can get by with. If your pistol design permits it, put just the slide on the frame without the barrel and spring, and move the slide back and forth. Does it feel smooth or does the slide seem to be binding or catching as it moves?
At this point you may determine that all of these surfaces are smooth and properly finished. Congratulations. You have bought yourself a quality handgun. Apply a light coat of lube to the moving surfaces and a bit of grease to the slide rails and cocking lug, and you’re good to go. I like Break-Free CLP and Rem-Oil for lubricant and Mil-Tec, Mil-Comm, and Wilson Ultimalube for grease, but I have also been known to use military surplus rifle grease in a pinch.
On the other hand, you may have discovered some rough spots or burrs and want to clean them up. Perhaps you just want to polish the feed ramp and chamber a bit. Even quality guns can sometimes have little rough spots that need to be dressed. Or, you may have an Eastern Bloc gun which is a good reliable shooter but has a lot of mill marks and roughness that you want to clean up. With some guns, like the little Kel-Tec, it is generally advisable to do what is called a “fluff and buff” on all of the internal moving surfaces to enhance reliability and function. (For the absolute best “fluff and buff” for the Kel-Tec P32, visit Golden Loki’s site at http://www.goldenloki.com/guns/keltec/prep.htm )
Basic Principles for a Successful Fluff and Buff:
- Easy Does It
- Less Is Best
- Most of this is going to happen in time anyway
- It is much easier to take metal off than to put it back on
- Polish, don’t cut
- It’s better to stop too early than too late
My Tools:
- Variable Speed Cordless Dremel with polishing kit
- Red Jeweler’s Rouge
- DMT serrated knife sharpening wand
- Extra fine steel wool
- Curved-edge Arkansas white whetstone designed for sharpening gouges
- Brownell’s 44/40 Instant Gun Blue for touch-up
Notes on the Dremel Tool:
The Dremel tool is a highly capable and flexible instrument, especially the new variable speed models. Remember also that a lot of guns have been ruined with Dremel tools. The old single-speed Dremels ran too fast for most gun work. I don’t use any of the abrasive bits on the actions of my guns; only the felt polishing heads. I have used the fine stone tips to take off sharps on the outside of Eastern Bloc guns, but that’s all. Some folks will use extremely fine sandpaper, like 600 or 1200 grit to do this sort of work. While this will work on some surfaces and edges, I prefer the Dremel or stones. Professional gunsmiths like stones for many of these tasks.
I like the polishing effect of the Dremel with felt pads and rouge. If you need a bit more grit, the polishing compound that comes with the Dremel polishing kit is OK. I got some wooden-shafted Q-Tips and cut them in half. They fit the collet of the Dremel perfectly and once some extra cotton is removed, they make excellent polishing tools for small areas like the inside of firing pin channels. If I have to take away more metal than the polishing head will do, I’ll use steel wool. If I have to do more than steel wool will take away, I’ll use a fine emery stone, but for a “fluff and buff” you really shouldn’t have to go further than this.

Polishing the feed ramp with a Dremel:
Use one of the felt polishing tips, either the bullet shaped pad or the small felt wheel. Use red jeweler’s rouge. Jeweler’s rouge is color coded. Red is the finest grit. It doesn’t even feel gritty. It’s the one jewelers use to polish watch cases and such. Take your time and go slow. Polish the inside of the chamber also, especially the area toward the top of the chamber where the bullets make contact with the barrel when they feed. Polish, but do not remove enough metal to change the shape of the ramp or chamber. The rouge will leave a residue which should be cleaned off with powder solvent or lighter fluid. If I find a particularly rough spot inside the chamber, I will tie a bit of steel wool on a ¼” oak dowel and carefully smooth that place down.

Gunsmiths have traditionally “throated” the beveled surfaces of the barrel where the bullet enters the chamber in the G.I. M1911 and M1911A1 pistols. This is done by extending the bevel up higher around the breech, rounding the angle where the beveled throat meets the chamber, and in some cases increasing the angle of the throat bevel. Kids, don’t try this at home. Unless you are a certified armorer, you can blow up your gun by taking away metal that supports the cartridge case. Polish this area with the greatest of care. Less is best. You do not want to change the shape of these critical surfaces. With most modern M1911-pattern pistols, this “throating” is done at the factory and you do not need to do more (The barrel in the picture to the right has already been throated). You may, however, need to do some polishing of the ramp, throat and chamber.
Slide Rails:
One of the traditional “accurizing” operations done on the M1911 is tightening the slide rails. This, along with carefully fitting a slightly over-sized bushing, gives Old Slabsides a tighter and more consistent barrel lock-up. On the slide rails, the tightening is done by peening the rails down a little with a hammer and then lapping them to smooth the contact surfaces. The lapping is done by putting a bit of polishing compound in the slide rail grooves and moving the slide back and forth on the frame until it smoothes down. For the M1911, a little tool was developed which locks into the slots which hold the bushing at the front of the slide. It’s just a little handle which makes it easier for the gunsmith to work the slide back and forth during the lapping process. The point of this little digression is that the slide itself is the polishing tool for the slide rails. You can dissolve a bit of jewelers rouge in lighter fluid and paint this fluid into the slide rails. Then put the slide on the frame and work it back and forth.
Some guns may require a bit more work on the slide rails. If you find burrs and catches in the grooves or the rails themselves, these should be carefully worked out with steel wool (or the ultra-fine sand paper). The DMT diamond sharpening wand is long and narrow and is excellent for hard to reach spots in the grooves. The red handled model is their fine grit and it does a good job. Use a very light touch because this instrument can quickly cut metal. The sharpening wand was particularly helpful with the tiny slide rail grooves of the P-32.
The objective with polishing the slide rails is to get a slide which moves smoothly without any grittiness or catches. A slide which is not being slowed by excess friction will feed ammo more reliably and cycle faster.

Other Areas of the Slide which may require attention:
On the slide, I polish the inside of the barrel bushing, the cocking lug which depresses the hammer when it cycles, and the area in front of the ejection port where the locking lugs are found on the M1911. I will also do a bit of polishing on the breech face. The firing pin channel should be checked for smoothness and given a light coat of oil. The firing pin hole in the breech face should be checked for burrs.
The Five Minute Trigger Job for the M1911
Well, not really, but this is a trick which will help smooth a trigger break which is slightly rough. Cock the hammer and dribble a drop of oil down the front of the hammer. The drop of oil will roll down the hammer onto the sear hooks. Cock and release the hammer a couple of times to get the oil into the sear hooks. Then (with the gun unloaded and ammo stored safely in an adjacent county) dry fire the gun while applying light pressure to the back of the hammer. Do this about ten times. Don’t get muscular with it. This will have the effect of lubricating the sear face and the sear hooks and polishing the sear face. It’s not a huge difference, but depending on the gun, it can result in a noticeable smoothing of the trigger break.
Break-in
The break-in of a pistol does not involve the mysticism and voodoo often afforded precision high powered rifles. Just take it to the range and shoot it, a hundred rounds or so, watching for any malfunctions or strange behavior. Then bring it home and clean it well and re-apply lubrication. If you get through five of these hundred-round cycles without a malfunction, you have a solid and reliable pistol. Be sure to test any new service ammo with 200 rounds before adopting it. At 1000 rounds you can consider the pistol fully broken-in. Don’t be afraid to dry fire your pistol. It’s good practice and, despite a lot of mythology which goes around about dry firing, it will not harm modern center-fire pistols.
Lubrication
Different models of guns have different needs for lubrication. M1911’s tend to like some oil and slide grease. Glocks and Berettas don’t seem to need much. Climate also plays a role in this equation too. In a very dry and dusty environment, grease can catch grit in a tightly fitted gun and hinder reliability. In a wet climate, a light coat of oil will guard the metal from rust. In an extremely cold climate, oil and grease can congeal and even freeze. A one-size-fits-all prescription for lubrication is just not possible. If you operate in a moderate climate, some protective oil and slide grease will most likely help the gun to function better and protect it from rust, corrosion and excessive friction on the moving parts. We recommend Mil-Comm grease, oil and cleaner.
Get a Grip
There is one part of autoloader reliability which is not hardware related: your grip. Even the most superbly reliable autoloader can be tricked into a malfunction by a weak grip. The physics of the situation is that an autoloader needs a firm support against which it can recoil. If you find that you are having jams on a pistol which other experienced shooters fire without malfunctions, it may be that you need a firmer grip on the gun. It may be as simple as remembering to grip the gun firmly when you fire it. It may also mean doing some exercise to strengthen your hands and arms. Squeezing a tennis ball, push-ups, and punching a bag all help. If you watch the master pistol shooters, you will notice that they don’t allow the muzzle of their guns to flip up much if at all. The more the pistols flips up and back during the recoil cycle, the greater your chances are of experiencing a malfunction.
The Single Best, Cheapest, Easy-To-Do Reliability Enhancement for the M1911 Pistol
If you shoot full-powered ammo, install an extra power recoil spring. I recommend an 18.5# spring for Government Models and 22# springs for Commander-length guns. This modification reduces or eliminates feed failures and reduces the battering on the frame of the gun. Some have said that it also reduces felt recoil, but I don’t notice much of a difference. Don’t do this if you’re planning to use light target loads because the light loads may not have enough power to cycle the slide completely. Another option is to save your original spring and switch it back in for the lower powered ammo.
Wrapping it up
The fluff and buff is basically a matter of helping along the natural effects of friction and wear, and it grows out of the primary observation that guns which are broken in well tend to be more reliable than pistols which are new. Many will say that a pistol is broken in at 500 rounds. My observation is that this should be considered a bare minimum. 1000 rounds, especially for a serious duty gun, is a better mark. As I said at the outset, very little of this cannot also be accomplished by running a couple thousand rounds through the gun. The trouble is that we don’t always have the luxury of firing 2K rounds before we put a gun into service. Be gentle with your polishing and let logic guide you and you won’t have any problems. It is entirely possible that you may buy a gun which will need none of this whatsoever. This is no cause for alarm. Sometimes a pistol just comes off the line right and nothing more is needed.

Comments, suggestions, contributions? Let me know