By John L. Marshall
It’s pretty well agreed that one of the top firearms inventors of the 20th Century was John Moses Browning. One of his finest creations was the U.S. Pistol, Model of 1911. Browning designed this pistol to be suitable for use by the U.S. military services, and in this he succeeded admirably. Although 90 years have elapsed since the pistol was adopted for service, it is still in use by U.S. military units, and very much in demand in the civilian sector. Less generally known is that Browning designed many parts of the 1911 pistol to be used as tools in its own disassembly and assembly. Even the .45 ACP cartridge itself could be used for work on the gun!

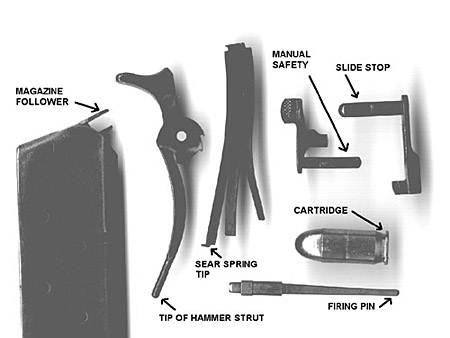
Have you ever wondered why the slots in the grip screws on the big .45 are concave rather than simply flat? Wonder no more. Browning designed those screws so that the rim of the .45 ACP cartridge could be used to unscrew them! You don’t need a screwdriver for this task if you have a single cartridge available!
Once the manual safety is removed, the safety and slide stop plungers can be withdrawn and used to drift out the hammer pin.
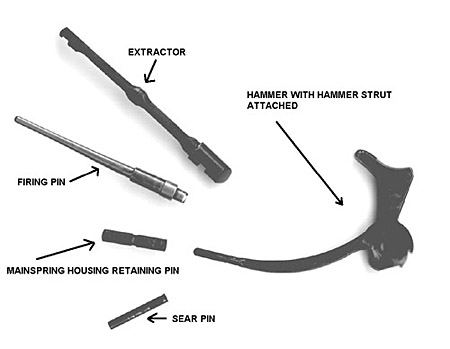
The hammer strut is far and away the most useful tool provided with the 1911 pistol. It can be used to drift out the mainspring housing pin and the sear pin both. It also serves to press in on the firing pin so that the firing pin stop can be removed, and then it works to pry out the extractor. It can be used to drift out the link pin from the barrel on those pistols where the link pin is not staked in place. It can also be used to retain the depressed magazine spring when inserted in an inspection hole, so that the magazine follower can be removed! Some modern-manufacture 1911-style pistols have a flat end to the hammer strut. While this design functions acceptably and is easier to manufacture, it subverts one of this part’s intended uses: it can’t be used very well as a drift punch. The flat variety can be filed down to the round shape. It’s worthwhile to do it.

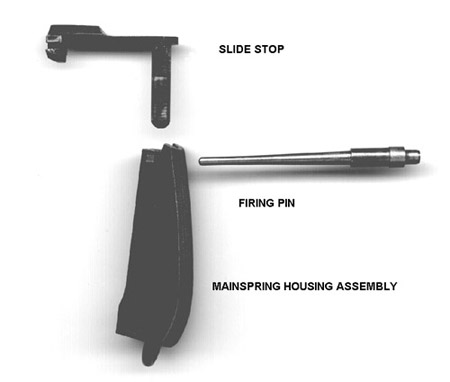
The shaft of either the slide stop or the manual safety can be used to depress the mainspring cap while the firing pin is used to start the mainspring cap pin out of its hole to free the mainspring, its cap, and the mainspring housing pin retainer.
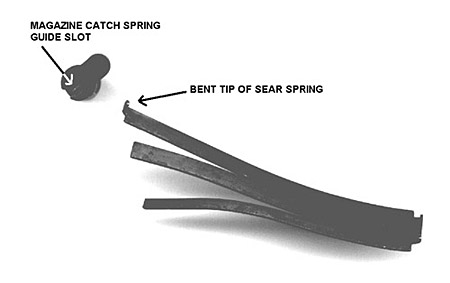
That little bent piece at the end of the leaf-style sear spring can be used to twist the magazine catch spring guide to remove the magazine catch and its spring.
The magazine follower can be used to depress the safety plunger while the manual safety is being reinserted in place.
Here’s the lowdown on complete disassembly of the pistol, using only the pistol and its cartridge for tools:
First, clear the pistol of any cartridges by removing the magazine and then retracting the slide to remove any round in the chamber. Inspect the chamber carefully to be absolutely sure the pistol is unloaded before proceeding.
Next, apply the manual safety and press in on the recoil spring plug, which will allow the barrel bushing to be rotated clockwise. Carefully remove the recoil spring plug, which is under spring pressure.
Release the manual safety and pull the slide back until the disassembly notch in the slide lines up with the end of the slide stop. Remove the slide stop from the frame. Slide the slide and barrel assembly forward off the frame.
Remove the barrel bushing by rotating it counterclockwise. Remove the recoil spring and the recoil spring plug from the slide. Tip the barrel link forward, and remove the barrel and its link forward through the muzzle of the slide.
Cock the hammer and with the manual safety midway between the off and on positions, wiggle it out of the frame. Lower the hammer. With the fingertips, remove the safety and slide stop plungers with their attached spring from the plunger tube.
Use one of the removed plungers inserted from the right of the frame to start the hammer pin from its seat. Remove the hammer pin, and remove the hammer and its strut.
Use the hammer strut, with the hammer attached, to drift out the mainspring housing pin. Remove the mainspring housing. Remove the grip safety and the leaf-style sear spring.
Use the hammer strut to remove the sear pin, drifting it out from right to left. Shake out the sear and disconnector

Partially depress the magazine catch, and use the little right-angled bent portion of the leaf-style sear spring to rotate the magazine catch spring guide counterclockwise. The magazine catch can now be removed. Use the same part to rotate the magazine catch spring guide clockwise to allow the guide and its spring to be removed from the magazine catch body.
The trigger can now be pressed to the rear and withdrawn from the frame.
Use the hammer and its strut to press in on the firing pin, allowing the firing pin stop to be slid down and out of the slide. Remove the firing pin and its spring. Use the hammer strut to pry the extractor out of its hole in the slide.
While it’s not recommended for normal disassembly because the mainspring is under heavy compression, the mainspring housing can be taken apart using the shaft of the slide stop or the manual safety to depress the cap while the firing pin starts the retaining pin out of its hole. Keeping pressure on the cap with the slide stop or safety, the retaining pin can now be withdrawn, releasing the cap, the mainspring, and the mainspring pin retainer.

The magazine can be disassembled by using the slide stop shaft to partially depress the follower while the hammer strut is inserted over a magazine spring coil through an inspection hole to retain it. Then the magazine follower can be removed from the top of the magazine.
As mentioned, the flat end of the magazine follower can be used to depress the safety plunger when reinserting the manual safety – you don’t have to disassemble the magazine to accomplish this trick!
So there you have it – complete disassembly and assembly of the 1911 pistol is possible without using one external tool. The pistol itself contains all the implements necessary to do the job!
© 2001 by John L. Marshall

Comments, suggestions, contributions? Let me know